What is Compression? A Simple Tutorial in FL Studio
Compression is a technique in music production that helps control the volume of your sounds, making your music more balanced and polished. Think of it like a friendly giant who gently squeezes a bouncy ball so it doesn't bounce too high or too low. Let's learn how to use compression in FL Studio!

Understanding Compression
Imagine you have a friend who speaks very loudly at times and very quietly at others. You want them to speak at a nice, even volume so everyone can hear clearly. Compression helps make loud sounds quieter and quiet sounds louder, creating a more consistent volume.
Step-by-Step Guide to Compression in FL Studio
1. Open FL Studio and Load Your Sounds:
Start by opening FL Studio and loading the sound you want to compress. It could be a vocal, drum, or any other instrument.
2. Put the Sound in a Mixer Channel:
- Click on the sound you want to compress.
- In the mixer, choose an empty slot (let’s say Insert 1) and put the sound there. This is like giving your friend a specific place to stand.
3. Add a Compressor:
- Select the mixer channel (Insert 1) where your sound is.
- In the effects section, add Fruity Limiter. This is like giving the friendly giant a tool to gently squeeze the sound.
4. Switch to Compression Mode:
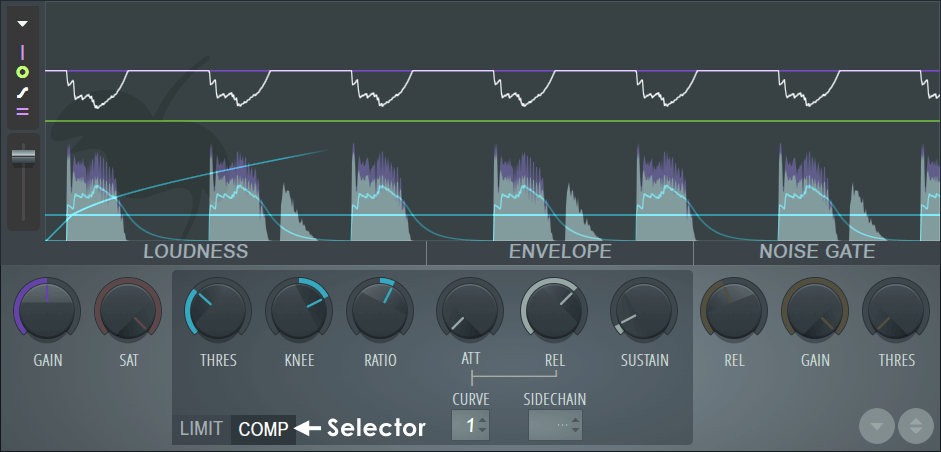
- Open the Fruity Limiter and click on the ‘Comp’ button to switch to the compressor settings. Now the giant is ready to start controlling the volume.
5. Adjust the Compressor Settings:
- Threshold: This is like setting a height limit for your bouncy ball. Any sound above this level will be squeezed. Lower the threshold to start compressing more of the sound.
- Ratio: This is how strong the squeeze is. A higher ratio means more compression. Start with a ratio of 4:1 and adjust as needed.
- Attack: This is how quickly the giant starts squeezing after the sound gets too loud. A fast attack means immediate squeezing. Set a low attack to catch quick, loud sounds.
- Release: This is how quickly the giant lets go after the sound gets quieter. A short release means the squeeze stops quickly. Adjust the release to make the sound feel natural.
- Gain: This boosts the overall volume after compression. Think of it as giving your friend a little microphone so their voice is clear.
6. Listen and Adjust:
- Play your sound and listen. Adjust the settings until the loud parts are nicely controlled and the quiet parts are more audible. This may take some tweaking to get just right.
7. Listen and Tweak:
- Play your song and listen. You should hear the bass get quieter every time the kick drum plays. If it’s too much or too little, adjust the settings until it sounds just right.
Easy Tips for Compression
- Start Simple: Don’t worry about getting it perfect right away. Start with basic settings and adjust slowly.
- Watch the Levels: Use the mixer’s volume meters to see how the compression is affecting your sound.
- Use Your Ears: Trust your ears. If it sounds good to you, it probably is!
Conclusion
Compression is like having a friendly giant in your music who helps keep everything at a nice, even volume. By following these easy steps in FL Studio, you can start using compression to make your tracks sound professional and polished. Remember, practice makes perfect, so keep experimenting and have fun making music!
